The Ultimate Guide to the Viral Jiggling Dessert
The culinary world is constantly evolving, but few phenomena have captured the collective imagination quite like the japanese cheesecake trend. If you have scrolled through social media at any point in the last few years, you have undoubtedly witnessed the mesmerizing, viral videos taking over japanese cheesecake tiktok. These videos feature a gloriously golden cake that jiggles like a set pudding when tapped and pulls apart to reveal an impossibly airy, cloud-like interior. This dessert is a masterclass in culinary engineering, balancing the rich, tangy profile of a traditional Western cheesecake with the ethereal, melt-in-your-mouth lightness of a French soufflé.
This global sensation has sparked long queues outside specialty bakeries worldwide. From the artisanal pastry shops of japanese cheesecake montreal to the elegant, high-end boutiques of japanese cheesecake paris, pastry chefs are meticulously perfecting this delicate dessert. Brands like japanese cheesecake takumi have built entire empires entirely around the precise execution of this single, flawless bake. But you do not need to book an international flight or wait in a two-hour line to experience it. With the right technique, patience, and understanding of the science behind the bake, you can create the perfect japanese cotton cheesecake right in your own home kitchen.
While the internet is flooded with shortcuts—most notably the popular japanese cheesecake 2 ingredients hack that utilizes only eggs and melted white chocolate—these simplified versions, while tasty, simply cannot replicate the complex texture and authentic flavor of the traditional method. Similarly, some modern bakers experiment with a japanese cheesecake yogurt base to create a lighter, more acidic profile, which is a wonderful variation we will discuss. However, mastering the foundational, authentic japanese cheesecake recette is an essential rite of passage for any serious home baker.
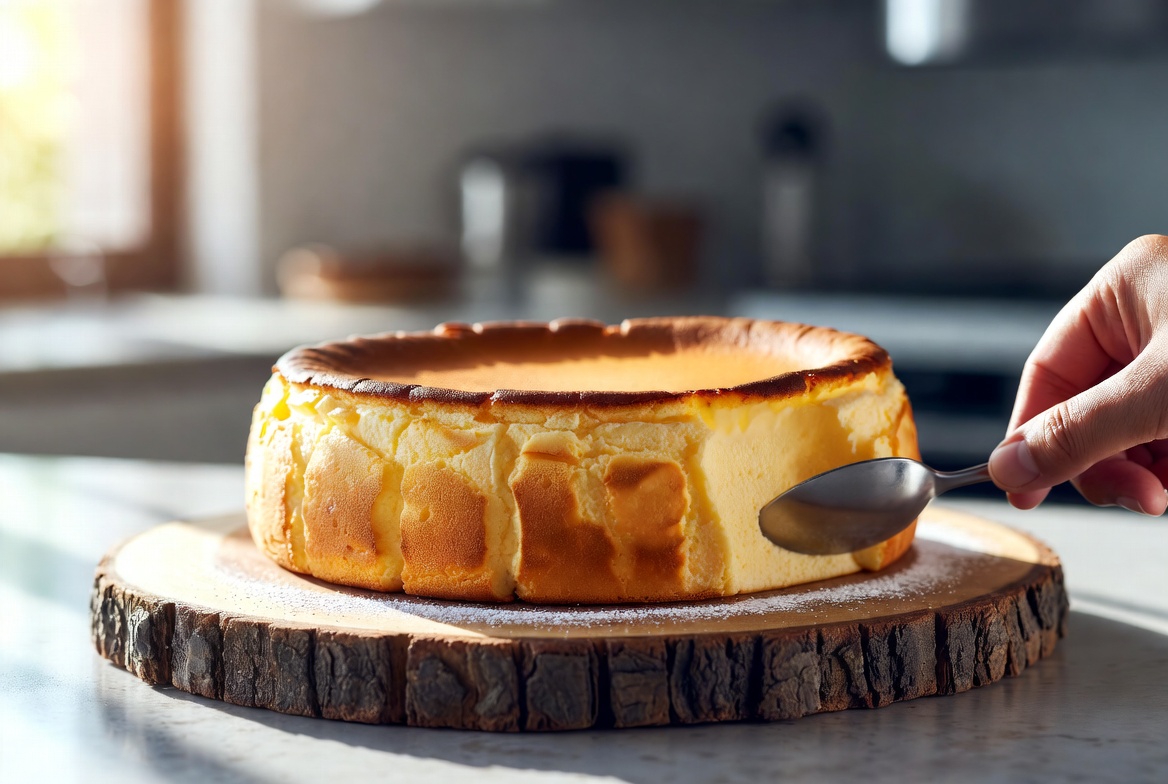
The perfect Japanese cotton cheesecake is characterized by its golden-brown top and incredible jiggle.
Understanding the Science of the Japanese Cotton Cheesecake
Before diving into the recipe, it is crucial to understand what makes this japanese cheesecake recipe so different from its New York-style cousin. A standard cheesecake relies on a massive volume of dense cream cheese, heavy cream, and whole eggs baked into a sturdy, heavy block. In stark contrast, the Japanese iteration separates the eggs. The egg whites are whipped into a delicate, voluminous meringue, which is then gently folded into a warm cream cheese batter.
The trapped air bubbles inside the meringue expand during the slow, low-temperature baking process, forcing the cake to rise significantly. The addition of a water bath (bain-marie) ensures that the ambient temperature in the oven remains moist and gentle, preventing the delicate proteins in the eggs from seizing, curdling, or cracking. This precise combination of meringue aeration and steam baking is what creates the famous, cloud-like japanese cheesecake trend texture.
Essential Ingredients for Success
Because this cake relies heavily on technique, the quality and temperature of your ingredients are non-negotiable. Every ingredient must be brought to room temperature before you begin. Cold ingredients will cause the cream cheese to clump, resulting in a lumpy batter that will deflate your meringue.
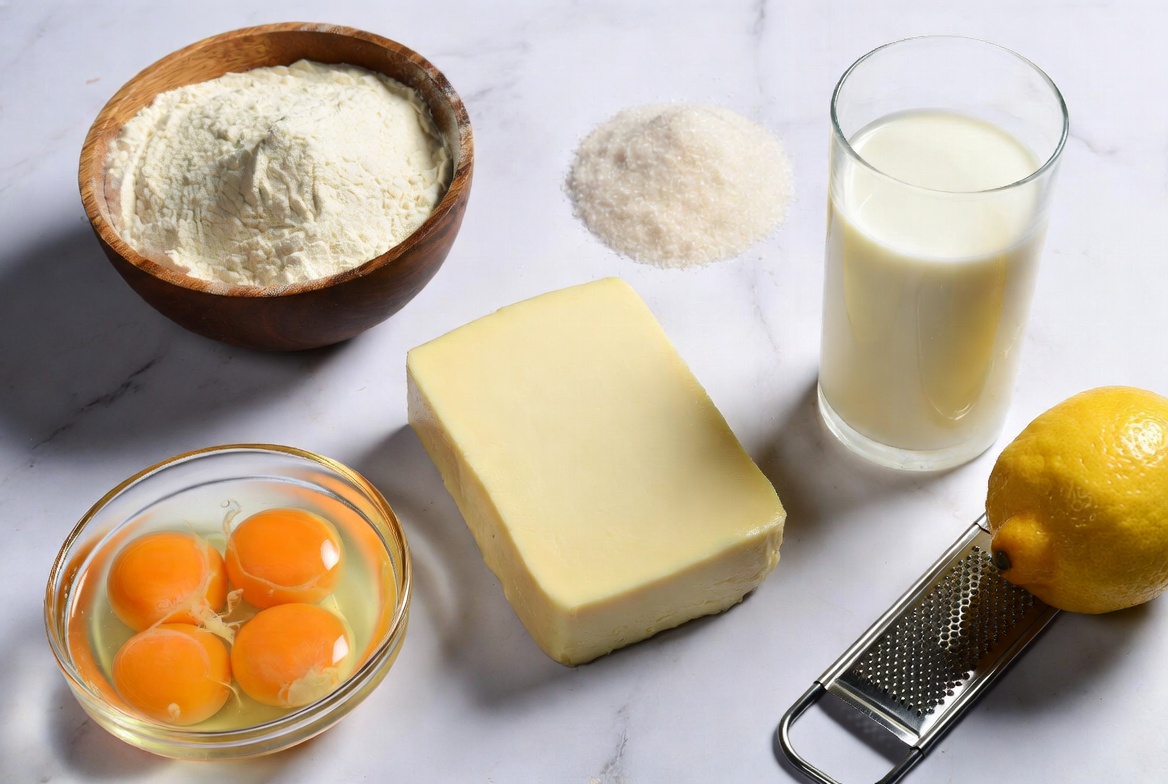
Always ensure your eggs and cream cheese are completely at room temperature before beginning the recipe.
The Cream Cheese Batter
- 250g Full-Fat Cream Cheese: Do not use whipped or low-fat cream cheese. You need the fat content for flavor and structural integrity.
- 60g Unsalted Butter: Adds richness and a silky mouthfeel to the final crumb.
- 100ml Full-Cream Milk: Thins the cheese mixture so it can seamlessly incorporate with the delicate meringue. Note: If you are attempting the japanese cheesecake yogurt variation, substitute 50ml of the milk with 50g of full-fat plain Greek yogurt for a delightful, tangy twist.
- 6 Large Egg Yolks: Provides the rich, custard-like flavor and beautiful yellow hue.
- 60g Cake Flour: Cake flour has a lower protein content than all-purpose flour, ensuring the cake remains incredibly soft and tender rather than chewy or bread-like.
- 20g Cornstarch: Acts as a stabilizer, helping to bind the moisture and prevent the cake from weeping after it cools.
- 1 tsp Pure Vanilla Extract & 1 tbsp Fresh Lemon Juice: These two ingredients are vital for cutting through the richness of the cheese and neutralizing any overly "eggy" flavors that sometimes plague soufflé-style cakes.
The Meringue
- 6 Large Egg Whites: Must be completely free of any yolk. Even a drop of fat will prevent the whites from whipping properly.
- 140g Fine Granulated Sugar: You will use half in the cheese batter and half in the meringue. Fine sugar dissolves easier in the egg whites.
- 1/4 tsp Cream of Tartar: An acid that stabilizes the egg whites, helping them hold their shape and preventing over-whipping. If you don't have it, a splash of lemon juice will suffice.
Step-by-Step Instructions: Mastering the Technique
Step 1: Pan Preparation (Crucial)
Do not skip this step. You will need an 8-inch round springform pan. Because the cake bakes in a water bath, you must aggressively waterproof your pan. Wrap the entire exterior base and sides of the pan in three layers of heavy-duty aluminum foil. Next, line the inside bottom with a circle of parchment paper. Line the inside walls with a collar of parchment paper that extends at least 2 to 3 inches above the rim of the pan. The japanese cotton cheesecake will rise significantly during baking, and it needs this parchment collar to support its climb. If it spills over, the structure will collapse.
Step 2: Preparing the Cheese Base
Set up a double boiler by placing a heat-proof glass bowl over a saucepan of gently simmering water (ensure the bottom of the bowl does not touch the water). Add your cream cheese, butter, and milk to the bowl. Whisk gently until the mixture is completely melted, smooth, and homogeneous. Remove the bowl from the heat and let it cool for 5 minutes. Vigorously whisk in the egg yolks, half of your sugar (70g), the vanilla extract, and the lemon juice. Finally, sift the cake flour and cornstarch directly into the bowl. Whisk until the batter is absolutely smooth and free of any lumps. Pass the mixture through a fine-mesh sieve into a clean bowl to guarantee a silky texture.
Step 3: Whipping the Meringue
This is where the magic of the japanese cheesecake recette happens. In a pristine, grease-free bowl, begin whipping your egg whites on medium-low speed until they become frothy and opaque. Add the cream of tartar. Gradually stream in the remaining 70g of sugar, one tablespoon at a time, while increasing the mixer speed to medium-high. You are aiming for "soft to medium peaks." When you lift the whisk, the meringue should form a peak that gently folds over onto itself like a bird's beak. Do not whip to stiff peaks! If the meringue is too stiff, it will be impossible to fold into the batter, resulting in large air pockets and a cake that aggressively cracks in the oven.
Step 4: The Art of Folding
Take one-third of your meringue and add it to the cream cheese batter. Use a whisk to gently mix it in; this sacrifices a little bit of air to lighten the dense cheese mixture. Now, switch to a silicone spatula. Add the next third of the meringue, using a gentle "cut and fold" motion—slice down the middle of the batter, scrape the bottom of the bowl, and fold it over the top. Repeat with the final third of the meringue until no white streaks remain. Be incredibly gentle; you want to preserve as many trapped air bubbles as possible to achieve that viral japanese cheesecake tiktok jiggle.
Step 5: The Steam Bake
Pour the incredibly airy batter into your prepared pan. Tap the pan firmly on the kitchen counter two or three times to force any large, trapped air bubbles to the surface. Place your foil-wrapped pan into a larger roasting pan. Carefully pour boiling water into the roasting pan until it reaches about 1 inch up the sides of your cheesecake pan.
Bake in a preheated oven at 160°C (320°F) for exactly 20 minutes. This initial burst of heat helps the cake rise and set its structure. Then, without opening the oven door, reduce the temperature to 110°C (230°F) and bake for an additional 60 minutes. The slow, low-temperature bake cooks the interior custard gently without burning the top.
Step 6: The Cooling Process
Once the baking time is complete, turn off the oven. Do not remove the cake! If you pull the cake out into the cold room-temperature air, the shock will cause the delicate soufflé structure to violently collapse and shrink. Instead, crack the oven door open slightly (you can use a wooden spoon to keep it propped open) and let the cake sit in the cooling oven for 30 minutes. Afterward, remove it from the water bath and let it cool completely on the counter before carefully peeling away the parchment collar.
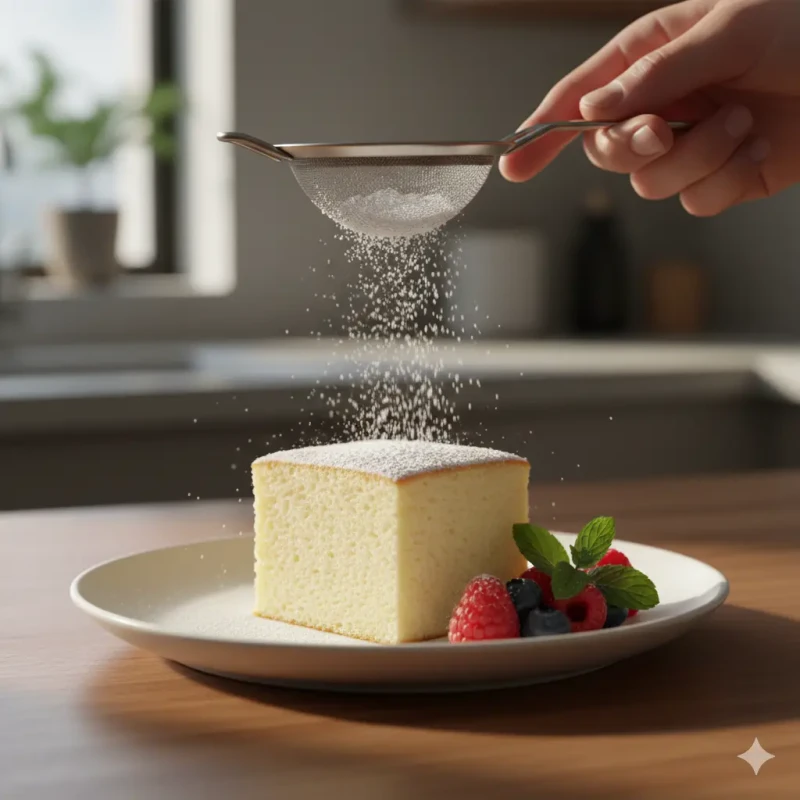
Keep the dressing simple: a dusting of icing sugar and fresh berries highlight the cake's delicate flavor perfectly.
Serving, Dressing, and Storage
The beauty of this japanese cheesecake recipe lies in its minimalist elegance. Unlike dense American cheesecakes smothered in heavy cherry compotes or chocolate ganache, this delicate cake requires a lighter touch. The most traditional dressing is a simple, snowy dusting of powdered icing sugar, occasionally stamped with a hot branding iron featuring a bakery's logo, much like you would see at japanese cheesecake takumi.
If you prefer a more elevated presentation, taking inspiration from the pastry cases of japanese cheesecake paris, serve your slice with a vibrant, tart raspberry or passionfruit coulis on the side. Fresh strawberries, blueberries, and a tiny sprig of fresh mint also make for a beautiful, fresh contrast to the rich cream cheese. If you opted for the tangier japanese cheesecake yogurt variation, a light drizzle of high-quality acacia honey over the top slice is absolutely divine.
For storage, place the completely cooled cake in an airtight container in the refrigerator. Interestingly, while the cake is incredibly fluffy and jiggling when served warm on day one, its flavor deepens and its texture becomes beautifully dense and velvety—more akin to a traditional cheesecake—after resting in the fridge for 24 hours. It will keep well in the refrigerator for up to 4 days.
Frequently Asked Questions and Troubleshooting
Why did my Japanese cheesecake crack on top?
Cracking is the most common issue bakers face, and it usually stems from two culprits: oven temperature and meringue stiffness. If your oven runs too hot, the batter will rise too rapidly, causing the top to rupture before the inside is cooked. We highly recommend using an independent oven thermometer. Secondly, if you whipped your egg whites to stiff, dry peaks rather than soft, glossy peaks, the batter will lack the flexibility it needs to expand smoothly, resulting in deep fissures.
Why did my cheesecake shrink drastically and become dense?
All soufflé-style cakes will shrink slightly as they cool—this is normal. However, extreme shrinkage or a dense, rubbery bottom layer is usually caused by either under-baking or over-mixing. If you are too aggressive when folding the meringue into the cheese base, you will knock out all the trapped air, leaving a dense, heavy batter that cannot hold its shape. Additionally, removing the cake from the oven too quickly causes a rapid temperature shock that violently deflates the structure.
Is the "2 Ingredient" Japanese Cheesecake actually good?
The japanese cheesecake 2 ingredients trend—which mixes whipped egg whites into melted white chocolate—is a fun, accessible kitchen experiment that yields an airy, sweet, chocolatey sponge. However, it completely lacks the tangy depth of cream cheese, the structural stability of flour, and the luxurious mouthfeel of butter and milk. It is a completely different dessert and will not satisfy a craving for a genuine japanese cotton cheesecake.
Mastering this iconic dessert takes patience, but pulling a perfectly golden, jiggly cake from your oven is one of the most rewarding experiences in home baking. Enjoy the process, respect the science, and savor every bite!