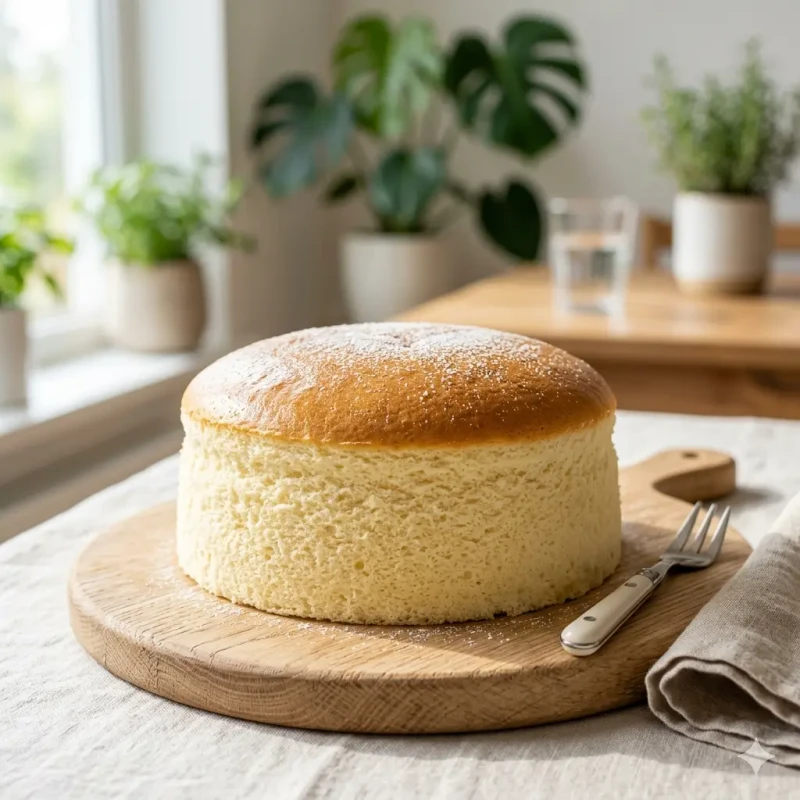
Have you been mesmerized by the Japanese cheesecake viral phenomenon that's exploding across TikTok, Instagram, and baking forums worldwide? This isn't your average dense cheesecake—it's a light-as-air, irresistibly jiggly creation that wobbles like a cloud when you give the pan a gentle tap. The Japanese cheesecake trend has captured millions of home bakers because it delivers restaurant-quality results with surprisingly simple techniques. Whether you're a seasoned pro or a curious newbie, mastering this Japanese cheesecake recipe will elevate your dessert game to new heights. In this ultimate guide, we'll cover every detail, including exciting twists like the Japanese cheesecake yogurt recipe that adds tangy creaminess with Greek yogurt for a lighter, protein-packed version.
The magic lies in its soufflé-like rise and melt-in-your-mouth texture, making it perfect for special occasions or everyday indulgence. If you've ever wondered why videos of this cake going viral rack up millions of views, it's all about that signature jiggle combined with subtle sweetness. And for those searching "Japanese cheesecake near me" on a whim, we'll share pro tips later on finding it locally. But trust me—once you bake your own using our Japanese cheesecake recipe, you'll never look back. Ready to transform your kitchen into a Japanese bakery? Let's get started with the full breakdown, from history to hacks.
Pro tip before we dive deeper: This Japanese cheesecake yogurt recipe keeps things balanced with just the right amount of tang from Greek yogurt, making it fresher and more modern than traditional versions. The Japanese cheesecake viral wave shows no signs of slowing, so grab your ingredients and join the fun!
The History and Science Behind the Jiggly Texture of Japanese Cheesecake
Japanese cheesecake traces its roots back to the 1960s in Japan, where innovative bakers sought to create a lighter alternative to heavy American-style cheesecakes. Inspired by soufflé techniques and local preferences for delicate desserts, the style gained massive popularity in the 1990s thanks to iconic chains like Uncle Tetsu. What started as a niche treat in Japanese patisseries quickly spread globally, fueling the Japanese cheesecake viral trend we see today on social media. Bakers worldwide fell in love with its unique cotton-soft texture that sets it apart from anything else.
The science is what truly makes this dessert special. Unlike dense cheesecakes loaded with cream cheese and heavy cream, Japanese cheesecake relies on a high ratio of whipped egg whites folded into a creamy base. This meringue technique traps air bubbles that expand during baking, creating that iconic jiggle and fluffy mouthfeel. The water bath (bain-marie) method ensures gentle, even heat distribution, preventing the proteins from toughening too quickly. Add in cornstarch and flour for structure, and you get a cake that's stable yet ethereally light.
Temperature control is everything here—the cake bakes low and slow at around 150°C (300°F), then cools gradually to avoid shrinkage or cracks. This precise balance of fats from cream cheese and yogurt, acids from lemon juice, and stabilized egg whites is why your Japanese cheesecake recipe turns out perfect every time. If you're into the Japanese cheesecake yogurt angle, swapping in Greek yogurt enhances the tang while maintaining the science of aeration, making the final product even more irresistible. For deeper dives into baking chemistry, check our guide to international desserts.
Ingredients for the Japanese Cheesecake Yogurt Recipe
Let's break down every ingredient in this Japanese cheesecake yogurt recipe so you understand exactly why each one matters. This version incorporates full-fat Greek yogurt for a delightful tang and extra moisture, aligning perfectly with the rising Japanese cheesecake Greek yogurt trend. It keeps the cake lighter than classic versions while boosting creaminess and subtle probiotic benefits. All measurements are for an 8-inch springform pan serving 8-10 people—scale up or down as needed. Room temperature ingredients are non-negotiable for seamless blending and maximum jiggle.
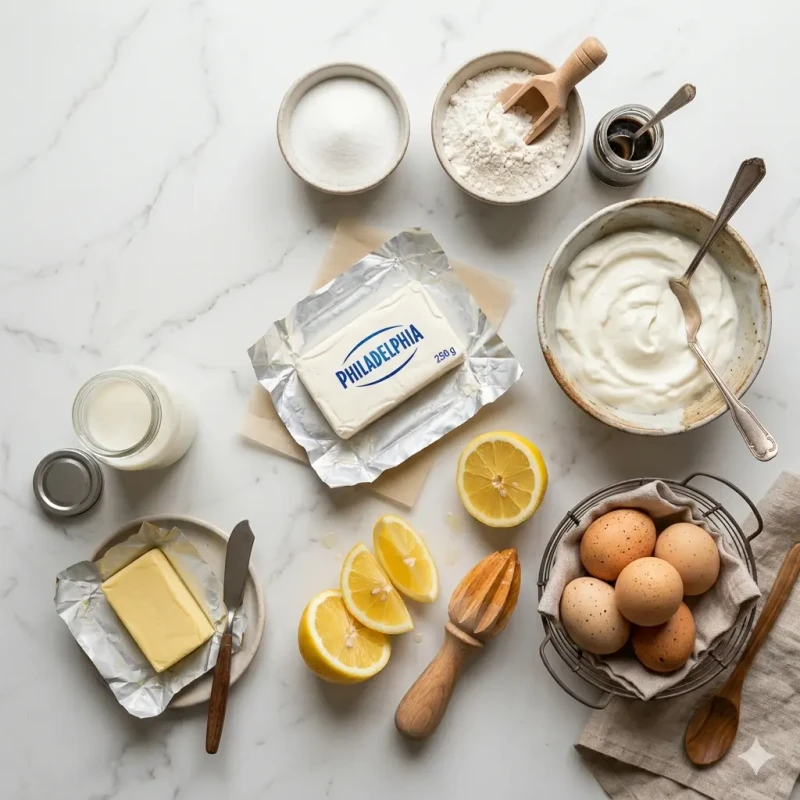
- 250g full-fat cream cheese: The heart of any Japanese cheesecake recipe. Let it soften completely at room temperature for lump-free melting. It provides rich creaminess without weighing down the airy texture.
- 150g full-fat Greek yogurt: This is the star for our Japanese cheesecake yogurt recipe twist! It adds bright tang, replaces some milk for better structure, and creates an even jigglier result. Choose plain, unsweetened for best flavor balance.
- 60g unsalted butter: Melted gently to add silkiness. It emulsifies with the dairy for that melt-in-mouth quality essential to Japanese cheesecake.
- 100ml whole milk: Helps loosen the base mixture during melting. Warm it slightly to prevent curdling when combined with cream cheese.
- 6 large eggs, separated: Yolks for richness in the base; whites whipped into stiff meringue for the signature jiggle. Fresh eggs whip better—use room temperature for maximum volume.
- 100g granulated sugar (divided): Half for the yolk base, half for meringue. It stabilizes the whites and sweetens gently without overpowering the tang from Greek yogurt.
- 20g cake flour (or all-purpose): Sifted for lightness. It provides just enough structure so the cake holds its shape after baking.
- 20g cornstarch: The secret to that cottony softness. It absorbs moisture and prevents sogginess in this Japanese cheesecake yogurt recipe.
- 1 tablespoon lemon juice: Brightens flavors and stabilizes egg whites during whipping. Fresh is best for the cleanest taste.
- 1 teaspoon vanilla extract: Optional but recommended for depth. It complements the Greek yogurt tang beautifully.
To measure accurately every time, grab this digital kitchen scale. Total prep time is about 30 minutes before baking begins.
Step-by-Step Japanese Cheesecake Recipe Instructions
Step 1: Prepare Your Pan and Oven
Preheat your oven to 150°C (300°F). Grease an 8-inch springform pan lightly with butter, then line the bottom and sides with parchment paper extending 2 inches above the rim—this allows the cake to rise freely without sticking. Wrap the outside of the pan tightly with two layers of heavy-duty aluminum foil to prevent water seepage during the bain-marie bake. Place the pan inside a larger roasting pan for the water bath. This setup is crucial for the even, gentle heat that defines a perfect Japanese cheesecake recipe.
Step 2: Melt the Dairy Base
In a heatproof bowl over a double boiler (or microwave in 20-second bursts), combine cream cheese, Greek yogurt, butter, and milk. Stir constantly until completely smooth and silky—no lumps allowed! Remove from heat and let cool slightly for 5 minutes. Whisk in egg yolks one at a time, followed by half the sugar (50g), lemon juice, and vanilla. This creates a velvety emulsion that will carry the airy meringue later.
Step 3: Sift in Dry Ingredients
Sift the cake flour and cornstarch directly into the yolk mixture. Whisk gently until just combined—overmixing develops gluten and ruins the fluff. The batter should be thick but pourable at this stage, thanks to the Greek yogurt addition in our Japanese cheesecake yogurt recipe.
Step 4: Whip the Meringue
In a spotlessly clean bowl (wipe with lemon if needed), beat egg whites on medium speed until foamy. Add the remaining 50g sugar gradually while increasing to high speed. Whip to stiff, glossy peaks—about 5-7 minutes. The meringue should hold its shape but not be dry. This step is the soul of the jiggle!
Step 5: Fold Everything Together
Add one-third of the meringue to the yolk base and fold gently with a spatula using a cut-and-fold motion. Repeat with the rest in two more additions. Be patient—deflating the air will kill the Japanese cheesecake texture. The final batter should be uniform, light, and fluffy like clouds.
Step 6: Bake in the Water Bath
Pour batter into the prepared pan. Tap gently to release large bubbles. Fill the roasting pan with hot water halfway up the sides. Bake for 60-70 minutes until the top is golden and the center jiggles slightly when shaken. Turn off the oven but leave the cake inside with the door cracked for 30 minutes to prevent sudden collapse.
Step 7: Cool and Release
Remove from oven and cool completely on a wire rack for 2 hours. Chill in the fridge for at least 4 hours (overnight is ideal) before unmolding. The patience here rewards you with flawless jiggle every time.
Follow these steps precisely and your Japanese cheesecake recipe will be bakery-worthy. Total active time is around 45 minutes.
Japanese Cheesecake Hack and Rice Cooker Method
Short on time or oven space? The ultimate Japanese cheesecake hack is adapting it for a rice cooker—perfect for apartments or quick bakes! This no-oven Japanese cheesecake in rice cooker method delivers nearly identical fluff with minimal effort. Simply prepare the batter exactly as above up to the folding stage. Line your rice cooker inner pot with parchment, pour in the batter, and select the "cake" or "steam" mode (if available) for 45-60 minutes. Some models have a dedicated dessert setting—check your manual. After cooking, let it rest on warm for 20 minutes, then cool as usual.
This Japanese cheesecake in rice cooker hack saves energy and space while preserving the viral jiggle. For even better results, use a 5-6 cup capacity cooker and wrap the lid with a kitchen towel to absorb condensation. It's a game-changer for beginners exploring the Japanese cheesecake trend without fancy equipment. If your rice cooker lacks modes, use the "cook" cycle twice with manual checks. Either way, this hack proves anyone can master Japanese cheesecake at home.
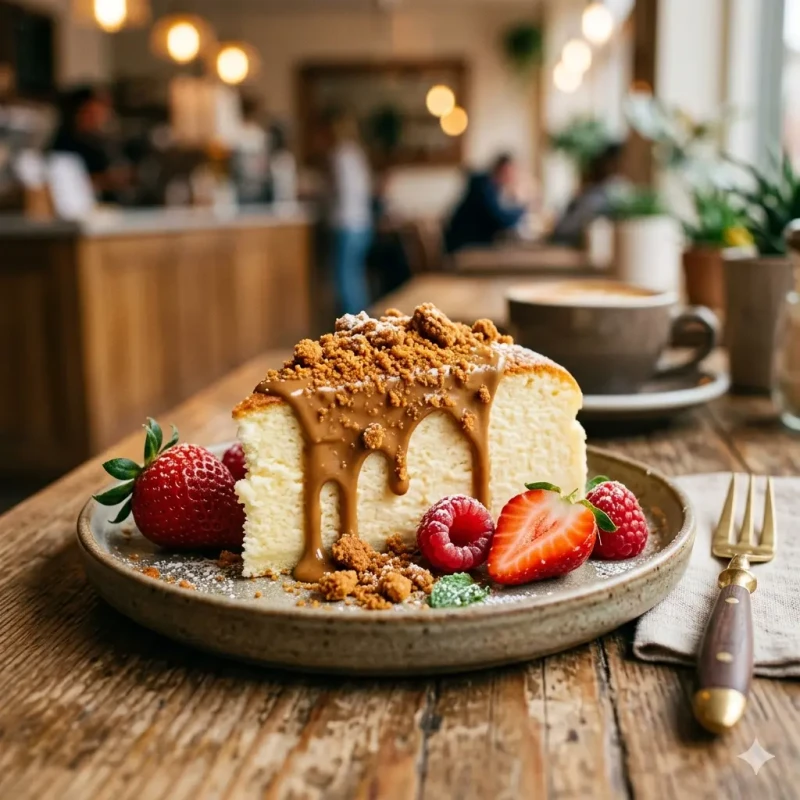
Creative Flavor Variations: Japanese Cheesecake Biscoff Edition
Once you've nailed the base Japanese cheesecake recipe, experiment with flavors! The Japanese cheesecake biscoff variation is a crowd-pleaser inspired by the viral cookie butter craze. Swirl 100g melted Biscoff spread into the yolk base before folding meringue, or spread it on top after chilling for a caramelized crunch. The warm spice notes pair magically with the tangy Greek yogurt, elevating the entire dessert.
Other twists include matcha powder (2 tsp sifted in dry ingredients) for earthy green tea vibes or strawberry puree folded in for fruity freshness. For chocolate lovers, add 50g melted dark chocolate. Each variation keeps the signature jiggle intact while letting your creativity shine. The Japanese cheesecake biscoff version has been blowing up on dessert tables everywhere—try it and watch your friends beg for the recipe!
Japanese Cheesecake Near Me: Where to Find It If You Don't Want to Bake
Not in the mood to bake? No problem! Simply open Google or your favorite maps app and type "Japanese cheesecake near me" for instant results. Major cities often feature dedicated Japanese bakeries or chains like Uncle Tetsu, Le Crepe, or local patisseries specializing in Asian fusion desserts. In urban areas, look for cafes in Asian districts or high-end grocery stores with bakery sections.
Popular spots frequently rotate flavors, including the Japanese cheesecake yogurt versions we've discussed. Apps like Yelp or DoorDash make delivery easy too. If nothing pops up, check specialty Asian markets—they often stock frozen versions from Japan. The Japanese cheesecake near me search usually yields hidden gems within minutes, so you can enjoy the viral treat without turning on your oven. But baking your own is infinitely more satisfying and customizable!
Expert Tips for the Perfect Jiggle and Troubleshooting Common Issues
Achieving that flawless wobble in your Japanese cheesecake recipe comes down to a few pro secrets. Always use room-temperature ingredients to avoid lumps and ensure smooth folding. Whip whites in a clean, grease-free bowl for maximum volume. Bake low and slow—rushing with higher temps causes cracks. For extra insurance against shrinkage, cool the cake gradually: oven off with cracked door, then room temp, then fridge.
Troubleshooting:
- Cracking on top? Oven too hot or water bath too shallow—lower temp by 10°C next time and ensure water reaches halfway up the pan.
- Shrinking after cooling? Meringue deflated during folding or sudden temperature drop. Fold more gently and cool slowly as described.
- Dense texture instead of jiggly? Under-whipped whites or overmixed batter. Use a hand mixer on high and stop when peaks are stiff but glossy.
- Too sweet or tangy? Adjust sugar down 10g or Greek yogurt amount in the Japanese cheesecake yogurt recipe.
These tips guarantee success every bake. For similar airy techniques, explore our soufflé recipe collection.
Serving and Decorating Your Japanese Cheesecake
Once chilled, release the springform and peel away parchment for a clean presentation. Dust lightly with powdered sugar or cocoa for elegance. Slice with a hot, wet knife for perfect portions that showcase the internal jiggle. Pair with fresh berries, whipped cream, or a drizzle of honey to complement the Greek yogurt tang. For the biscoff lovers, spread a thin layer of cookie butter on top and sprinkle crushed Biscoff cookies for crunch.
Serve at room temperature for maximum fluff or straight from the fridge for a firmer bite. This Japanese cheesecake shines as a light ending to any meal—guests will be amazed by the texture! Store leftovers covered in the fridge up to 4 days; the jiggle holds beautifully.
Frequently Asked Questions About Japanese Cheesecake Recipe
What makes Japanese cheesecake different from regular cheesecake?
Japanese cheesecake is far lighter and airier due to the meringue folding technique and water bath baking, resulting in that famous jiggly texture. Traditional cheesecakes are dense and creamy from heavy cream and more cheese. Our Japanese cheesecake yogurt recipe adds even more lightness with Greek yogurt, making it a modern favorite in the Japanese cheesecake viral trend. The flavor is subtle and less sweet, letting the ingredients shine.
Can I make a Japanese cheesecake yogurt recipe at home?
Absolutely! Our detailed Japanese cheesecake yogurt recipe above swaps in Greek yogurt for extra tang and moisture without sacrificing the signature jiggle. It's one of the easiest ways to customize the classic while keeping it authentic. The yogurt helps stabilize the batter too, reducing common issues like cracking. Follow the steps exactly for bakery results every time.
How do I achieve the perfect jiggle in my Japanese cheesecake?
The secret is proper meringue technique—stiff but not dry peaks—and gradual cooling after baking. Use the water bath religiously and incorporate Greek yogurt as in our Japanese cheesecake Greek yogurt version for added stability. Tap the pan before baking to release bubbles, and never open the oven door early. With practice, you'll nail that viral wobble that everyone raves about!
What is the Japanese cheesecake hack for beginners without an oven?
The rice cooker method is the ultimate Japanese cheesecake hack! Prepare the batter as usual, then cook on the cake or steam setting for 45-60 minutes. It's foolproof for small kitchens and delivers the same fluffy results as the oven version. This Japanese cheesecake in rice cooker approach has become a game-changer for the trend, proving you don't need fancy equipment.
Where can I find Japanese cheesecake near me quickly?
Search "Japanese cheesecake near me" on Google Maps or delivery apps for local bakeries, Asian cafes, or chains. Many spots now offer yogurt-infused or biscoff variations too. If you're in a bigger city, check Yelp for highly rated patisseries. Delivery options make the viral treat accessible anytime without baking.
Is Japanese cheesecake biscoff a popular variation?
Yes! The Japanese cheesecake biscoff twist is exploding in popularity for its caramel-spiced flavor that pairs perfectly with the light base. Swirl Biscoff spread into the batter or top after chilling—it's an easy upgrade to the standard Japanese cheesecake recipe that impresses every time.
Why does my Japanese cheesecake shrink or crack?
Common culprits include rapid cooling, over-whipped or under-folded meringue, or temperature fluctuations. Follow our troubleshooting in the tips section and use Greek yogurt for better moisture retention in the Japanese cheesecake yogurt recipe. Gradual cooling in the oven is key to preventing both issues.
Can I freeze Japanese cheesecake?
Yes, but wrap individual slices tightly in plastic and foil. Thaw overnight in the fridge to preserve the jiggle. The texture holds up well for up to one month, making it great for batch baking your Japanese cheesecake recipe ahead of parties.
This Japanese cheesecake recipe guide has everything you need to succeed. Happy baking—the jiggle awaits!
{ "@context": "https://schema.org/", "@type": "Recipe", "name": "Japanese Cheesecake Recipe: Viral Jiggly Greek Yogurt Version", "image": [ "https://i.postimg.cc/Yqvj7sr2/Gemini-Generated-Image-asf31yasf31yasf3.webp" ], "author": { "@type": "Person", "name": "Admin" }, "datePublished": "2026-03-15", "description": "Master the viral Japanese cheesecake recipe with Greek yogurt for the ultimate jiggly, fluffy dessert. Includes step-by-step instructions and a rice cooker hack.", "prepTime": "PT30M", "cookTime": "PT1H10M", "totalTime": "PT1H40M", "keywords": "Japanese cheesecake, Greek yogurt, viral cake, jiggly dessert, rice cooker hack, Biscoff cheesecake", "recipeYield": "8 servings", "recipeCategory": "Dessert", "recipeCuisine": "Japanese", "nutrition": { "@type": "NutritionInformation", "calories": "280 kcal" }, "recipeIngredient": [ "250g Full-Fat Cream Cheese", "150g Full-Fat Greek Yogurt", "60g Unsalted Butter", "100ml Whole Milk", "6 Large Eggs, separated", "100g Granulated Sugar (divided)", "20g Cake Flour (or all-purpose)", "20g Cornstarch", "1 tablespoon Lemon Juice", "1 teaspoon Vanilla Extract" ], "recipeInstructions": [ { "@type": "HowToStep", "name": "Prepare Pan and Oven", "text": "Preheat oven to 150°C (300°F). Grease an 8-inch pan, line with parchment paper, and wrap the outside with aluminum foil for a water bath." }, { "@type": "HowToStep", "name": "Melt the Dairy Base", "text": "Melt cream cheese, Greek yogurt, butter, and milk over a double boiler. Whisk in egg yolks, 50g sugar, lemon juice, and vanilla." }, { "@type": "HowToStep", "name": "Sift in Dry Ingredients", "text": "Sift cake flour and cornstarch into the yolk mixture. Whisk gently until just combined." }, { "@type": "HowToStep", "name": "Whip the Meringue", "text": "Beat egg whites with the remaining 50g sugar until stiff, glossy peaks form." }, { "@type": "HowToStep", "name": "Folding", "text": "Gently fold the meringue into the yolk base in three batches using a spatula to maintain the airiness." }, { "@type": "HowToStep", "name": "Baking", "text": "Bake in a water bath at 150°C for 60-70 minutes. Let it sit in the oven with the door cracked for 30 minutes after turning it off." }, { "@type": "HowToStep", "name": "Cooling and Chilling", "text": "Cool on a wire rack for 2 hours, then chill in the fridge for at least 4 hours before serving." } ] }